Battery switch on travel trailer function is crucial for managing your RV’s power. This guide dives into the hows and whys of these switches, covering different types, installation, troubleshooting, and maintenance. We’ll explore the connections between your house and chassis batteries, the interplay with your charging system, and how to avoid common problems. Get ready to become a battery-management pro!
Understanding your travel trailer’s battery switch is key to reliable power. This involves knowing the various switch types (like 1-2-both-off), their wiring, and safe connection/disconnection procedures for your house and chassis batteries. We’ll also cover troubleshooting issues like power outages and blown fuses, and show you how to maintain your system for optimal performance and longevity.
Understanding Battery Switch Functionality in Travel Trailers
A battery switch is a crucial component in a travel trailer’s electrical system, allowing you to manage power from your house batteries and potentially connect to shore power efficiently and safely. It prevents accidental draining of your house batteries and helps protect your sensitive electronics. Understanding its function and proper usage is essential for reliable off-grid living.
Battery Switch Types
Travel trailers typically utilize one of two main types of battery switches: the 1-2-Both-Off switch and the single-pole double-throw (SPDT) switch. The 1-2-Both-Off switch offers three positions: one connects to the house batteries, two connects to the tow vehicle’s charging system, and both combines both power sources, charging your house batteries while also powering your trailer. The “Off” position completely disconnects both power sources, preventing battery drain.
An SPDT switch is simpler, offering only “On” and “Off” positions. It typically switches between house batteries and shore power, often used in conjunction with a separate charging system.
Wiring Diagram of a Typical Battery Switch Setup
A typical setup involves the battery switch placed between the house batteries and the trailer’s 12-volt DC system. One side of the switch connects to the positive (+) terminal of the house batteries. The other side connects to the positive (+) bus bar or distribution block feeding the trailer’s 12-volt circuits. The negative (-) terminal of the house batteries is typically connected directly to the negative (-) bus bar, bypassing the switch for safety reasons.
This configuration allows you to completely isolate the house batteries when the switch is in the “Off” position. A correctly wired system will also include appropriate fuses and circuit breakers for overcurrent protection.
So, you’re planning a trip? Awesome! Don’t forget travel insurance! Check out this option for comprehensive coverage: aon travel insurance. They’ve got various plans to suit different needs and budgets. And if you want to compare, another great resource is aon travel insurance , which offers similar plans but might have slightly different pricing or coverage details.
Comparing both sites is a smart move before you book!
Installing a Battery Switch
Installing a battery switch requires basic electrical knowledge and appropriate safety precautions. Always disconnect the negative (-) battery terminal before starting any work.
- Choose the correct location: Select a readily accessible location, ideally close to the batteries but protected from the elements.
- Secure the switch: Mount the switch securely using appropriate hardware to a stable surface.
- Connect the positive (+) wires: Connect one wire from the positive (+) battery terminal to one terminal of the switch. Connect the other terminal of the switch to the positive (+) bus bar. Ensure all connections are tight and secure.
- Connect the negative (-) wires: Connect the negative (-) terminal of the batteries directly to the negative (-) bus bar. Do not run the negative wire through the switch.
- Test the installation: After connecting all wires, carefully reconnect the negative (-) battery terminal. Test the switch in all positions to verify correct operation. Ensure that the trailer’s 12-volt systems work correctly when the switch is in the “On” position, and are completely off when in the “Off” position.
- Protect the installation: Use appropriate wire loom or conduit to protect the wiring and prevent damage.
Connecting and Disconnecting Batteries
Connecting and disconnecting your travel trailer’s batteries requires careful attention to safety and proper procedure. Improper handling can lead to serious consequences, including damage to your equipment and personal injury. This section details the correct steps and precautions to take.Connecting the house battery to the chassis battery allows you to charge the house battery using your vehicle’s alternator while driving.
Disconnecting them prevents unwanted drain on your vehicle’s battery and isolates the house battery system for maintenance or repairs.
Battery Connection Safety Precautions
Working with batteries involves potential hazards. Always wear safety glasses to protect your eyes from splashes of battery acid. Acid is corrosive and can cause serious burns. Furthermore, battery gases are flammable and explosive, so ensure good ventilation while working near batteries. Never allow sparks or open flames near batteries.
Use insulated tools to avoid short circuits and wear gloves to protect your hands from acid and potential cuts. Before disconnecting or connecting anything, always turn off any connected loads (lights, appliances, etc.) to prevent electrical shocks or sparks. If you are unsure about any step, consult a qualified technician.
Consequences of Improper Battery Connection
Improper battery connection can result in several problems. A reversed connection can damage the battery management system (BMS) or other sensitive electronics in your trailer, potentially leading to expensive repairs. A loose connection can cause arcing, leading to sparks, fire hazards, and damage to battery terminals. Moreover, incorrect connections can cause a parasitic drain on your vehicle’s battery, leaving you stranded.
Finally, incorrect handling can lead to battery acid spills, causing corrosion and personal injury.
Comparison of Battery Connection Methods, Battery switch on travel trailer function
Different methods exist for connecting house and chassis batteries, each with its advantages and disadvantages. The choice depends on your specific setup and needs.
| Connection Method | Advantages | Disadvantages | Suitable For |
|---|---|---|---|
| Direct Connection (using heavy-gauge wire) | Simple, reliable, efficient charging | Potential for large current draw on vehicle battery; requires careful wiring | Experienced users with good understanding of electrical systems |
| Battery Isolator | Protects vehicle battery from excessive drain; automatic switching | Adds cost and complexity; can fail | Most users; offers good balance of protection and convenience |
| Smart Battery Isolator | Similar to battery isolator, but with added features like voltage sensing and improved efficiency | Higher cost than basic isolator | Users prioritizing efficient charging and sophisticated protection |
| Separate Charging System (e.g., solar panel) | Independent charging; no reliance on vehicle alternator | Higher initial cost; requires additional components and maintenance | Users who frequently boondock or prefer off-grid power |
Troubleshooting Common Battery Switch Issues
Dealing with a malfunctioning battery switch in your travel trailer can be frustrating, leaving you without power when you need it most. Fortunately, most problems are relatively straightforward to diagnose and fix with some basic troubleshooting. This section will guide you through common issues, diagnostic steps, and solutions.
Identifying Common Battery Switch Problems
Several issues can arise with your travel trailer’s battery switch. The most common include a complete lack of power to the trailer’s 12-volt system, blown fuses within the switch itself or in related circuits, and the switch failing to properly connect or disconnect the batteries. Sometimes, the problem might be a corroded connection rather than the switch itself.
A clicking sound from the switch, but no power, could indicate a problem with the switch mechanism or a low battery. Finally, intermittent power issues suggest a loose connection or a failing switch.
Troubleshooting Steps for Battery Switch Malfunctions
Before diving into the switch itself, systematically check other potential problems. First, ensure your batteries are adequately charged. Use a multimeter to measure the voltage at the battery terminals; it should read around 12.6 volts for a fully charged battery. Next, inspect all fuses related to the 12-volt system, both at the battery and inside the trailer.
Replace any blown fuses, but investigatewhy* they blew before simply replacing them. A blown fuse might indicate a short circuit somewhere in the system. Check all wiring connections for corrosion, looseness, or damage, paying close attention to those near the battery and the switch. Clean and tighten any loose connections.
Testing the Battery Switch
With the batteries connected and the switch in the “on” position, use a multimeter to measure the voltage across the output terminals of the switch. You should read approximately the same voltage as the battery. If the voltage is significantly lower or zero, the switch itself is likely faulty. With the switch in the “off” position, the voltage should read near zero.
If you read any significant voltage, this also indicates a problem with the switch. Testing the switch in both positions will help determine if the switch is correctly isolating the batteries when off and properly connecting them when on.
Solutions for Fixing Common Battery Switch Problems
The solution depends on the specific problem identified during troubleshooting. Replacing blown fuses is the simplest fix, but remember to address the underlying cause. Tightening loose connections or cleaning corrosion will resolve many issues. If the switch itself is faulty, replacement is necessary. This typically involves disconnecting the wiring harness from the switch, removing the old switch, and installing the new switch, ensuring correct wiring.
If you are uncomfortable working with electrical systems, it is advisable to seek professional help. Replacing a battery switch is a relatively simple task for someone with basic electrical skills, but working with electricity always carries a risk. Always disconnect the batteries before working on the electrical system of your travel trailer.
Battery Switch and its Relation to Other Systems
Your travel trailer’s battery switch isn’t just a simple on/off switch; it’s a crucial component that dictates how power flows throughout your RV’s electrical system. Understanding its interaction with other systems is key to preventing electrical problems and ensuring reliable power.The battery switch acts as the central control point for your trailer’s batteries, determining which battery bank (or banks) provide power to the various systems.
This control directly impacts how your charging system replenishes your batteries and how your appliances and electronics receive power.
Charging System Interaction
The battery switch’s position directly influences how your charging system interacts with your batteries. When the switch is in the “off” position, the charging system will not charge the batteries connected to the switch, preventing any potential overcharging or short circuits. In the “both” or “battery” position, the charging system can effectively charge the connected battery bank(s). A faulty switch might prevent charging altogether, or cause it to charge only one bank when both should be charging, leading to undercharged batteries and reduced operational time for your appliances.
Power Distribution Management
The battery switch manages the flow of power from your batteries to the rest of your trailer’s electrical system. With the switch in the “on” position, power from the selected battery bank(s) is routed to your appliances, lights, and other electrical components. If the switch is faulty, it could lead to inconsistent power delivery, intermittent power outages, or even a complete loss of power to certain circuits.
This can cause unexpected appliance malfunctions or a lack of lighting.
Interaction with Converter and Inverter
The battery switch is intimately connected to both your converter and inverter. The converter, which transforms 12V DC power from your batteries into 120V AC power for household appliances, receives its DC input through the battery switch. Similarly, the inverter, which converts 12V DC to 110V AC power, relies on the battery switch to supply its DC power source. A faulty switch can interrupt this power flow, rendering your converter and inverter inoperable and leaving you without AC power for your appliances.
Potential Electrical Problems from a Faulty Battery Switch
A malfunctioning battery switch can cause a range of electrical problems. It’s crucial to identify and address these issues promptly to prevent further damage to your RV’s electrical system.
- Complete loss of power to certain circuits or the entire trailer.
- Intermittent power outages and flickering lights.
- Inconsistent power delivery to appliances.
- Inability to charge batteries correctly, leading to premature battery failure.
- Overheating of the battery switch itself due to short circuits.
- Damage to other electrical components due to power surges or shorts.
- Failure of the converter or inverter due to interrupted power supply.
Battery Switch Maintenance and Upkeep: Battery Switch On Travel Trailer Function
Keeping your travel trailer’s battery switch in good working order is crucial for reliable power. Regular maintenance prevents problems and extends the life of your system, saving you time, money, and frustration down the road. Neglecting this vital component can lead to dead batteries, system failures, and even costly repairs.Regular maintenance ensures your battery switch operates efficiently and safely, providing uninterrupted power to your appliances and systems.
This involves a proactive approach to inspection, cleaning, and occasional replacement, preventing unexpected breakdowns during your adventures.
Regular Maintenance Schedule
A simple schedule ensures your battery switch receives the attention it needs. Consider this plan:
- Monthly Inspection: Visually inspect the switch for any signs of corrosion, loose connections, or damage. Check the surrounding area for any signs of overheating or leakage.
- Quarterly Cleaning: Clean battery terminals and switch contacts with a wire brush and baking soda solution to remove corrosion. Apply a corrosion inhibitor to the terminals after cleaning.
- Annual Thorough Check: Perform a more comprehensive inspection, including testing the switch’s functionality and checking for any loose wiring or damaged components. This is a good time to check the tightness of all connections.
- Every Two Years (or as needed): Consider replacing the switch as a preventative measure. Switches are relatively inexpensive, and replacing an old switch before it fails prevents potential stranded situations.
Battery Terminal Inspection and Cleaning
Clean battery terminals are essential for optimal performance and to prevent corrosion which can lead to poor connections and power loss. Corrosion buildup acts as an insulator, preventing current from flowing freely.
- Safety First: Always disconnect the negative (-) battery terminal first before cleaning.
- Preparation: Gather your cleaning supplies: wire brush, baking soda, water, and a corrosion inhibitor (such as dielectric grease).
- Cleaning: Use the wire brush to remove any corrosion from the terminals and the battery switch contacts. Mix baking soda and water to create a paste, and apply it to the terminals. Scrub gently to remove any remaining corrosion.
- Rinse and Dry: Rinse the terminals thoroughly with clean water and allow them to dry completely.
- Apply Inhibitor: Apply a thin layer of corrosion inhibitor to the cleaned terminals and reconnect the negative terminal last.
Replacing a Faulty Battery Switch
Replacing a faulty battery switch is a relatively straightforward process, but always disconnect the battery’s negative terminal first for safety. Consult your travel trailer’s wiring diagram to ensure proper connection of the new switch. Replacing a faulty switch requires some basic electrical knowledge and tools such as screwdrivers and possibly wire strippers. If unsure, seek professional help.
So, you’re planning a trip? Awesome! Don’t forget travel insurance – it’s a lifesaver. Check out aon travel insurance for comprehensive coverage. They offer a wide range of plans, so you can find one that fits your needs and budget. Then, once you’ve got that sorted, compare it with another provider like aon travel insurance to ensure you’re getting the best deal.
Seriously, comparing quotes is key to finding the perfect travel insurance policy before you jet off!
Tips for Extending Battery Switch Lifespan
Proper care significantly extends the lifespan of your battery switch. Here are some helpful tips:
- Use a High-Quality Switch: Investing in a durable, high-quality switch from a reputable manufacturer is a worthwhile investment.
- Prevent Corrosion: Regularly clean the terminals and apply corrosion inhibitor as described above.
- Proper Wiring: Ensure all wiring connections are secure and properly insulated to prevent shorts or damage.
- Avoid Overloading: Don’t exceed the switch’s rated amperage. Overloading can lead to overheating and premature failure.
Illustrative Examples of Battery Switch Configurations
Understanding different battery switch setups is crucial for optimizing your travel trailer’s power system. The right configuration depends on your power needs and budget. Let’s explore three common setups: a simple single-battery system, a dual-battery system, and a system incorporating a solar panel.
Simple Single-Battery System
This is the most basic setup, ideal for trailers with minimal power demands. It involves a single 12-volt deep-cycle battery connected directly to the trailer’s electrical system. A simple on/off switch controls power to the appliances.The advantages are low cost and simplicity. Disadvantages include limited power capacity and vulnerability to complete power failure if the battery dies.Wiring representation:Battery (+) — Switch — Trailer Electrical System — Battery (-)
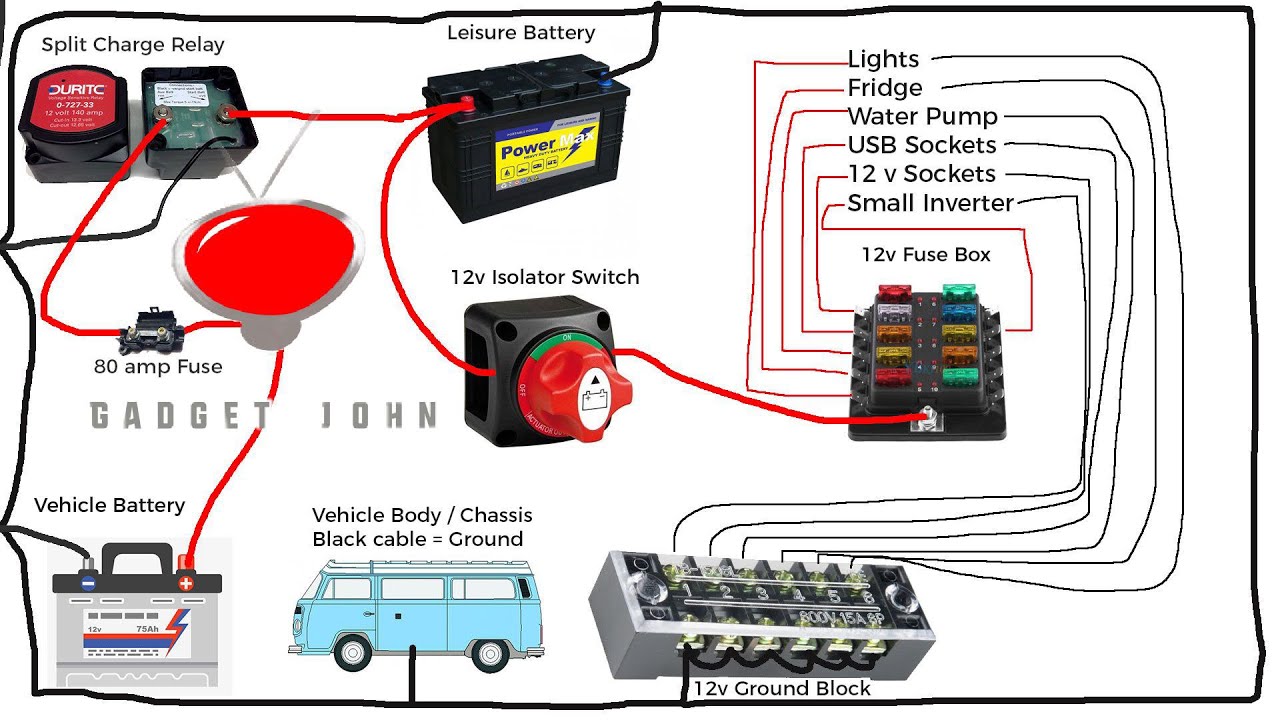
Dual-Battery System
This setup uses two 12-volt deep-cycle batteries, often a starting battery for the trailer’s engine and a house battery for appliances. A battery switch allows you to select between the batteries, combine them, or isolate them. This provides redundancy and increased power capacity.Advantages include increased power capacity and backup power in case one battery fails. Disadvantages include higher initial cost and slightly increased complexity.Wiring representation:Battery 1 (+) — Battery Switch (positions: Battery 1, Battery 2, Both, Off) — Trailer Electrical System — Battery 2 (-)Battery 1 (-)Battery 2 (+)
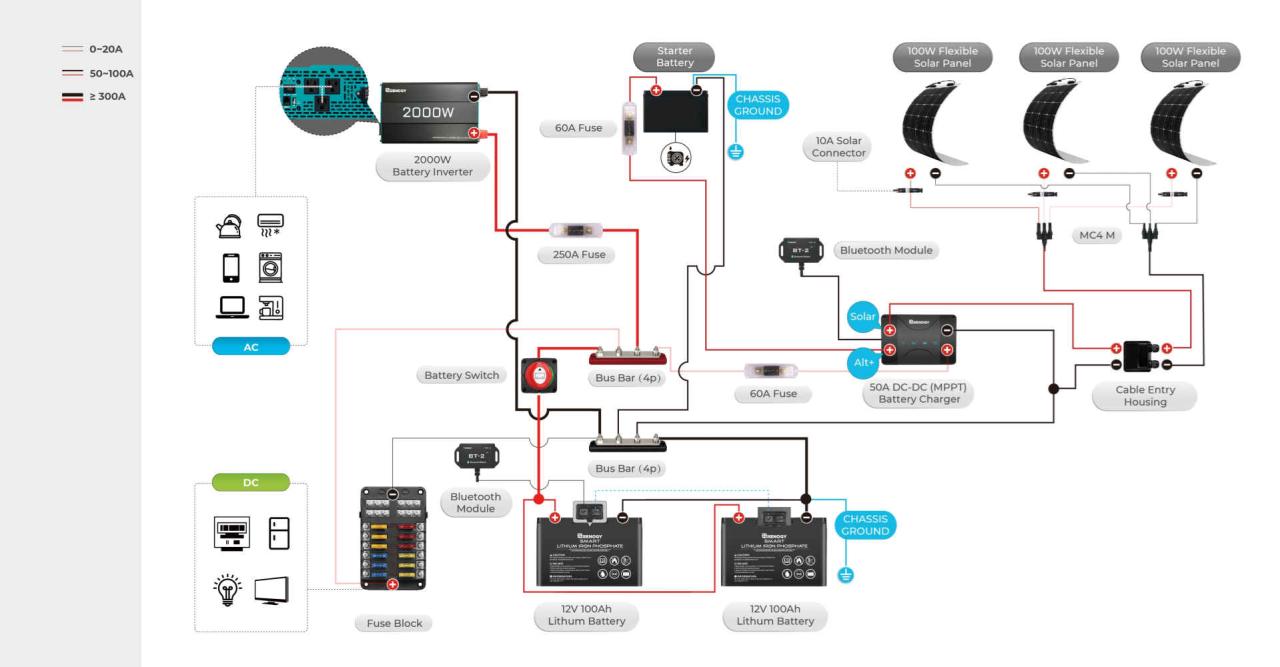
Dual-Battery System with Solar Panel
This setup combines the benefits of a dual-battery system with solar power for charging. A solar panel charges the house battery, extending its lifespan and reducing reliance on shore power. A charge controller regulates the solar power input to prevent overcharging.Advantages include increased power capacity, backup power, and extended battery life due to solar charging. Disadvantages include the highest initial cost and increased complexity due to the addition of the solar panel and charge controller.Wiring representation:Solar Panel (+) — Charge Controller — Battery 2 (+) — Battery Switch (positions: Battery 1, Battery 2, Both, Off) — Trailer Electrical System — Battery 2 (-)Battery 1 (+) — Battery SwitchBattery 1 (-)
Comparison of Configurations
| Configuration | Cost | Complexity | Functionality |
|---|---|---|---|
| Simple Single-Battery | Low | Low | Limited power, no backup |
| Dual-Battery | Medium | Medium | Increased power, backup power |
| Dual-Battery with Solar | High | High | Increased power, backup power, solar charging |
Mastering your travel trailer’s battery switch empowers you with reliable power and peace of mind. By understanding its function, performing regular maintenance, and knowing how to troubleshoot common problems, you’ll ensure your off-grid adventures are always powered up. Remember, safe handling of batteries is paramount – always prioritize safety when working with electrical systems. Happy travels!
Answers to Common Questions
What happens if I leave my battery switch in the “off” position for an extended period?
Leaving the switch off for too long won’t damage the switch itself, but your batteries might lose some charge over time due to parasitic drain from low-power devices.
Can I use a different type of battery switch than what came with my trailer?
Yes, but ensure the amperage rating of the new switch matches or exceeds your battery’s capacity. Incorrect amperage could lead to overheating or failure. Consult a qualified electrician if unsure.
How often should I inspect my battery terminals?
Inspect your battery terminals at least every three months, or more frequently if you use your trailer often. Look for corrosion, looseness, and damage.
My battery switch is making a clicking sound. What does that mean?
A clicking sound often indicates a problem with the switch itself or a low battery voltage. Check your batteries’ charge and the switch’s connections. If the problem persists, replace the switch.
